公式GitHub見てもよくわからなかったので備忘録的に
目次
Google Colabで動画を分析
Google Colabが動かせる状態、ランタイムはGPUを選択しています。
!pip install -q mediapipe opencv-python
# 3つのモデルがあります。今回は最も重い(高精度)の Heavyをダウンロードします
!wget -O pose_landmarker.task -q https://storage.googleapis.com/mediapipe-models/pose_landmarker/pose_landmarker_heavy/float16/1/pose_landmarker_heavy.task
import cv2
import numpy as np
import mediapipe as mp
from mediapipe import solutions
from mediapipe.framework.formats import landmark_pb2
from mediapipe.tasks import python
from mediapipe.tasks.python import vision
def draw_landmarks_on_image(rgb_image, detection_result):
pose_landmarks_list = detection_result.pose_landmarks
annotated_image = np.copy(rgb_image)
for idx in range(len(pose_landmarks_list)):
pose_landmarks = pose_landmarks_list[idx]
pose_landmarks_proto = landmark_pb2.NormalizedLandmarkList()
pose_landmarks_proto.landmark.extend([
landmark_pb2.NormalizedLandmark(x=landmark.x, y=landmark.y, z=landmark.z) for landmark in pose_landmarks
])
solutions.drawing_utils.draw_landmarks(
annotated_image,
pose_landmarks_proto,
solutions.pose.POSE_CONNECTIONS,
solutions.drawing_styles.get_default_pose_landmarks_style())
return annotated_image
base_options = python.BaseOptions(model_asset_path='pose_landmarker.task')
options = vision.PoseLandmarkerOptions(
base_options=base_options,
output_segmentation_masks=True
)
detector = vision.PoseLandmarker.create_from_options(options)
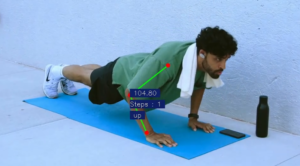
# 解析したい動画
input_video_path = '/content/筋トレ.mp4'
# 結果を保存するパス
output_video_path = '/content/result.mp4'
cap = cv2.VideoCapture(input_video_path)
if not cap.isOpened():
print("Could not open the video! Check video_path")
else:
fps = cap.get(cv2.CAP_PROP_FPS)
width = int(cap.get(cv2.CAP_PROP_FRAME_WIDTH))
height = int(cap.get(cv2.CAP_PROP_FRAME_HEIGHT))
fourcc = cv2.VideoWriter_fourcc(*'mp4v')
out = cv2.VideoWriter(output_video_path, fourcc, fps, (width, height))
while True:
success, frame_bgr = cap.read()
if not success:
break
frame_rgb = cv2.cvtColor(frame_bgr, cv2.COLOR_BGR2RGB)
mp_image = mp.Image(image_format=mp.ImageFormat.SRGB, data=frame_rgb)
detection_result = detector.detect(mp_image)
annotated_frame_rgb = draw_landmarks_on_image(frame_rgb, detection_result)
annotated_frame_bgr = cv2.cvtColor(annotated_frame_rgb, cv2.COLOR_RGB2BGR)
out.write(annotated_frame_bgr)
cap.release()
out.release()
print("Done!")